Pages

Tuesday, December 14, 2021

Santa Bread - #BreadBakers


This month I challenged the Bread Bakers to create art with their dough and I am so excited that so many were able to join me. Dough can be such an amazing canvas to work with. You can braid it. You can take your lame to it. You can twist it and turn it and add some colours and veggies to it. The possibilities are endless.  

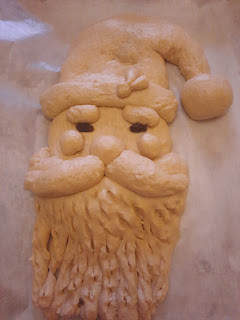
For my part, I decided to go with the spirit of the season and make a Santa Bread.  Santa Bread has been on my To-Do list for years. In fact, Facebook reminded me of it just yesterday.  It is actually pretty easy to make and I had wanted to make several versions but I ran out of time. By the way, my nephew and Santa had a run-in so his nose was creased. 


Santa Bread

Ingredients

400 grams flour
3 tablespoons sugar 
2 teaspoons yeast 
1 teaspoon salt 
220 ml milk
3 tablespoons oil 
1 egg yolk, beaten

2 raisins, currants, or chocolate chips (eyes)
1 egg yolk (egg wash)
Red food colouring (painting)

Directions 

Mix together all the ingredients (except the raisins, egg yolk for egg wash, and food colouring) and then knead until you have a smooth dough. The dough should not be sticky. If it is sticky, add in some more flour. Place the dough in a greased bowl. Cover and allow the dough to rest at room temperature until it has doubled. Alternatively, you can allow it to rest in the refrigerator overnight. 

Now it's time to have some fun!

Divide the dough into 4 equal pieces. 


Take the first piece and flatten it into an oval/circle. Mine had a diameter of about 5 inches. This will be Santa's face. 


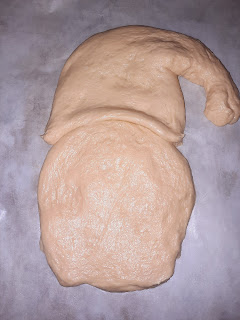
Take a second piece and shape it into a rough triangle then form it around Santa's head for his hat. 


The third piece will be Santa's beard. I wanted to try some different beard techniques here. In this version, I formed an elongated semi-oval/ U-type thing, put it in place, and adjusted it as necessary. 


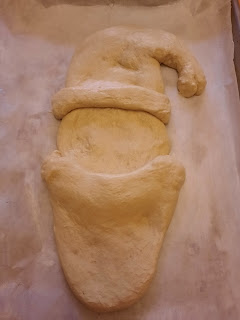
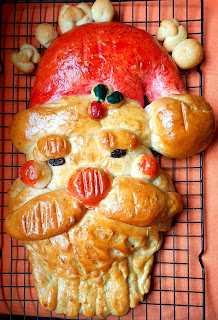
The fourth piece will form the band for Santa's hat, the pompom on the tip of his hat, his moustache, nose, cheeks, and eyebrows. You can even use the dough for the eyes. I didn't have any black or brown paint so I stuck with the raisins. 

Use scissors and snip the beard, if you like. You can use any extra dough for any decorations for your Santa.  Put in his eyes.


Preheat oven to 350 F. 

Let Santa rise until very puffy. Whisk the egg yolk with a splash of water and paint over the beard, moustache, face, eyebrows, hat band and pom pom. 

Add some red food colouring to the remaining yolk and paint the hat, cheeks, and nose. 

Bake 35 minutes until golden. 

When the Santa has cooled, you can touch up any areas with plain food colouring. 


BreadBakers


#BreadBakers is a group of bread loving bakers who get together once a month to bake bread with a common ingredient or theme. Follow our Pinterest board right here. Links are also updated each month on this home page. We take turns hosting each month and choosing the theme/ingredient.


Wednesday, December 1, 2021

Red Velvet Cupcakes - #FoodieExtravaganza


I have not participated in Foodie Extravaganza in aeons but I had to join for this very special one. Today we are celebrating the arrival of Lauren's gorgeous baby girl! Lauren started this group many years ago and it was an absolute pleasure to bake something to celebrate her and her precious little one! Congrats, Lauren!!! Scroll down to see what the other ladies are bringing to this virtual baby shower.

I chose these red velvet cupcakes because I had been eyeing them a couple weeks ago. Deb from Smitten Kitchen promised more chocolate flavour than you'd typically have in a traditional red velvet cake. I am typically not interested in red velvet but I am glad that I tried this. Definitely more flavourful than others that I have tried. And while delicious and moist and all things good, I think I will stick to chocolate. I am too much of a chocoholic to be satisfied by a hint. 


Red Velvet Cupcakes
Adapted from Smitten Kitchen
Yield ~ 9 cupcakes


Ingredients

1 cup plus 2 tablespoons cake flour
3 tablespoons cocoa powder
1/2 teaspoon salt 
1/2  cup oil 
3/4 cup sugar 
1 egg
2 tablespoons red food colouring
1/2 teaspoon vanilla 
7 tablespoons buttermilk
1/2 teaspoon baking soda 
1 teaspoon vinegar

Directions

Preheat oven to 350 F. Line a cupcake pan with cupcake wrappers. 

Whisk cake flour, cocoa powder, and salt. 
In another bowl, beat oil and sugar until well blended. Next, beat in the egg. 
Add the red food colouring and vanilla and beat well. 
Scrape down the sides of the mixing bowl. 
Alternate adding the flour and the buttermilk in two batches.
Scrape the bowl again. 
Place baking soda in a small dish then stir in the vinegar. Add immediately to the batter with the mixer running on low. Mix for 10 seconds.
Scoop batter into prepared cupcake pan. 

Bake 15 - 20 minutes or until a toothpick inserted into the centre of a cupcake comes out clean. 

Cool and frost as desired. 

Notes

  • I used a lot less oil than the original recipe and was happy with how the cupcakes turned out. You can check out the original recipe and decide for yourself. 
  • I used liquid food colouring. Check out the original recipe for the amounts needed for a gel colour. You would still need to dissolve it in water to avoid moisture loss. 
  • I did not use the traditional cream cheese frosting. This is a simple butter, powdered sugar, vanilla, and milk frosting. Oh, and a splash of rum. It needed a little something!


post signature


Foodie Extravaganza is where we celebrate obscure food holidays by cooking and baking together with the same ingredient or theme each month.

Posting day is always the first Wednesday of each month. If you are a blogger and would like to join our group and blog along with us, come join our Facebook page Foodie Extravaganza. We would love to have you! If you're a spectator looking for delicious tid-bits check out our Foodie Extravaganza Pinterest Board! Looking for our previous parties?