Pages

Tuesday, February 8, 2022

Cinnamon Breadsticks - #BreadBakers

This month the Bread Bakers are making breadsticks with our host Karen. I love savoury breadsticks but have been craving cinnamon rolls recently so I decided to try some cinnamon breadsticks. They turned out great but nothing beats the centre of the cinnamon roll. So that means I will have to make some sweet rolls soon. 

Scroll down to see all the mouthwatering breadsticks the other bakers made. 


Cinnamon Twisted Breadsticks


Cinnamon Breadsticks

Ingredients

Dough 
400 grams flour 
3 tablespoons sugar 
1 1/2 teaspoons istant yeast
1 teaspoon salt 
2 tablespoons oil 
1 cup water

Filling
1/4 cup sugar 
1 tablespoon cinnamon
3 tablespoons melted butter 


Directions 


Whisk together flour, sugar, yeast, and salt. Add the oil and water. Knead for about 7 minutes or until it forms a smooth dough. The dough should be tacky but not sticky. If it is sticky, add a wee bit more flour. Cover and allow to bulk ferment until doubled. You can do this overnight. 

Line a half sheet pan with parchment paper. 

Mix the sugar and cinnamon sugar together for the filling. 

Take the risen dough and roll out into a rectangle approximately 20" x 12". 

Brush the entire dough with the melted butter and then sprinkle the cinnamon sugar over half of the dough as seen below. 


Fold the side without the cinnamon sugar over onto the cinnamon sugar side.  You should now have a 12" x 10" rectangle. 

Cut one-inch strips along the longer side. Take each strip, twist it, and place it on the half sheet pan. 

Cover and let rise for 30 minutes. 

Preheat oven to 375 F. 

Bake the strips for 12 - 15 minutes or until they are lightly browned. 
BreadBakers


#BreadBakers is a group of bread loving bakers who get together once a month to bake bread with a common ingredient or theme. Follow our Pinterest board right here. Links are also updated each month on this home page.

We take turns hosting each month and choosing the theme/ingredient.


Monday, January 10, 2022

Callaloo Bread - #BreadBakers


The Bread Bakers are starting 2022 with lots of colours. Radha challenged us to make naturally coloured loaves. It's a very fun theme but I wanted to play it safe. I've used beets before and my loaf just ended up brown. I was afraid I would try something new and end up with brown bread again. I figured I would stick to my tried and true pumpkin without needing to go down a food science rabbit hole. 


I consulted my baking and everything else sounding boards but they were not feeling my boring pumpkin self. They encouraged me to use callaloo (a Jamaican leafy green similar to spinach but with a stronger flavour). I had originally planned a two-tone loaf but kneading colours into the dough makes you question your bread-baking choices. 

I completely forgot to take pictures of my dough after kneading and shaping but trust me, it was a lovely bright green. A completely different green came out of the oven, however.  I am just glad it wasn't completely brown. If you overcook callaloo, it does become a dark unsightly brown-ish colour so I was very worried about that. 

I am using an interesting method here that is similar to tangzhong. It's called the yudane method and involves pouring hot water over 20% of the recipe's flour and leaving it overnight. It results in an extremely soft dough. 

Be sure to scroll down to see all the beautiful creations the Bread Bakers have for you today. 


Callaloo Bread 
Yield: 1 loaf
Adapted from Bake with Paws

Ingredients 

Yudane
90g flour 
80g boiling water
Dough
150g milk 
100g callaloo
360g flour 
30 grams sugar 
18 grams oil
1 1/2 teaspoon instant yeast
1 1/4 teaspoon salt 
Egg or milk for egg or milk wash


Directions

Add flour to your mixing bowl and pour in the boiling water. Mix it together then cover and refrigerate for four hours or overnight. 

Blend the milk and callaloo until smooth. Callaloo can have thick stems. I did use stems in mine, I just ensured that everything was blended well. 

Tear up the yudane into small pieces and then add all the ingredients to the bowl. 

Knead together until the dough is smooth. You can do the windowpane test but yudane doughs seem to be less likely to achieve thin windowpanes. The original author recommends between 10 and 13 minutes of kneading time. 

Allow the dough to rise until doubled. 

When doubled, punch down the dough, shape and place in a 9" x 5" loaf pan. I did a four-strand braid on my loaf but you can do a regular loaf shape, if you wish. 

Leave the dough to rise once more until doubled. 

Preheat oven to 350 F. 

When the dough is ready, brush with egg wash or milk then bake for 25 to 30 minutes. 

Cool. Slice. Enjoy. 

Notes 
  • The callaloo flavour is mild but present. 

 
BreadBakers
Happy New Year! We are starting this year’s events with a colorful beginning. Our theme for this month is “Naturally Colored Breads” and Radha of Magical Ingredients is our host. #BreadBakers is a group of bread loving bakers who get together once a month to bake bread with a common ingredient or theme. Follow our Pinterest board right here. Links are also updated each month on this home page.

We take turns hosting each month and choosing the theme/ingredient.

post signature

Tuesday, December 14, 2021

Santa Bread - #BreadBakers


This month I challenged the Bread Bakers to create art with their dough and I am so excited that so many were able to join me. Dough can be such an amazing canvas to work with. You can braid it. You can take your lame to it. You can twist it and turn it and add some colours and veggies to it. The possibilities are endless.  

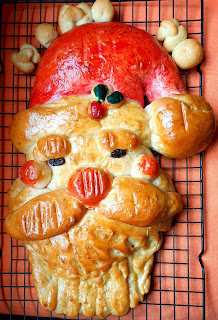
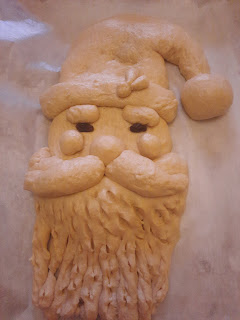
For my part, I decided to go with the spirit of the season and make a Santa Bread.  Santa Bread has been on my To-Do list for years. In fact, Facebook reminded me of it just yesterday.  It is actually pretty easy to make and I had wanted to make several versions but I ran out of time. By the way, my nephew and Santa had a run-in so his nose was creased. 


Santa Bread

Ingredients

400 grams flour
3 tablespoons sugar 
2 teaspoons yeast 
1 teaspoon salt 
220 ml milk
3 tablespoons oil 
1 egg yolk, beaten

2 raisins, currants, or chocolate chips (eyes)
1 egg yolk (egg wash)
Red food colouring (painting)

Directions 

Mix together all the ingredients (except the raisins, egg yolk for egg wash, and food colouring) and then knead until you have a smooth dough. The dough should not be sticky. If it is sticky, add in some more flour. Place the dough in a greased bowl. Cover and allow the dough to rest at room temperature until it has doubled. Alternatively, you can allow it to rest in the refrigerator overnight. 

Now it's time to have some fun!

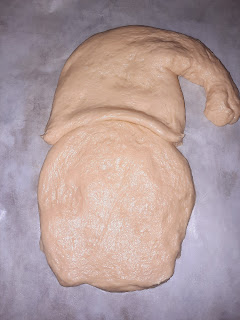
Divide the dough into 4 equal pieces. 


Take the first piece and flatten it into an oval/circle. Mine had a diameter of about 5 inches. This will be Santa's face. 


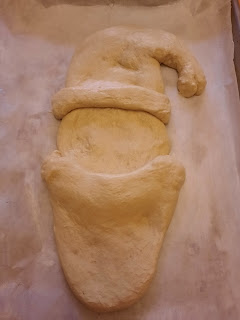
Take a second piece and shape it into a rough triangle then form it around Santa's head for his hat. 


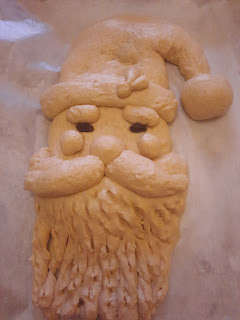
The third piece will be Santa's beard. I wanted to try some different beard techniques here. In this version, I formed an elongated semi-oval/ U-type thing, put it in place, and adjusted it as necessary. 


The fourth piece will form the band for Santa's hat, the pompom on the tip of his hat, his moustache, nose, cheeks, and eyebrows. You can even use the dough for the eyes. I didn't have any black or brown paint so I stuck with the raisins. 

Use scissors and snip the beard, if you like. You can use any extra dough for any decorations for your Santa.  Put in his eyes.


Preheat oven to 350 F. 

Let Santa rise until very puffy. Whisk the egg yolk with a splash of water and paint over the beard, moustache, face, eyebrows, hat band and pom pom. 

Add some red food colouring to the remaining yolk and paint the hat, cheeks, and nose. 

Bake 35 minutes until golden. 

When the Santa has cooled, you can touch up any areas with plain food colouring. 


BreadBakers


#BreadBakers is a group of bread loving bakers who get together once a month to bake bread with a common ingredient or theme. Follow our Pinterest board right here. Links are also updated each month on this home page. We take turns hosting each month and choosing the theme/ingredient.