Pages

Tuesday, December 14, 2021

Santa Bread - #BreadBakers


This month I challenged the Bread Bakers to create art with their dough and I am so excited that so many were able to join me. Dough can be such an amazing canvas to work with. You can braid it. You can take your lame to it. You can twist it and turn it and add some colours and veggies to it. The possibilities are endless.  

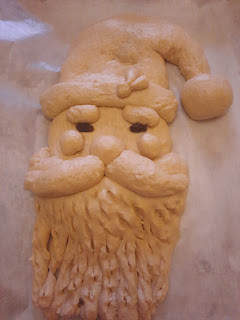
For my part, I decided to go with the spirit of the season and make a Santa Bread.  Santa Bread has been on my To-Do list for years. In fact, Facebook reminded me of it just yesterday.  It is actually pretty easy to make and I had wanted to make several versions but I ran out of time. By the way, my nephew and Santa had a run-in so his nose was creased. 


Santa Bread

Ingredients

400 grams flour
3 tablespoons sugar 
2 teaspoons yeast 
1 teaspoon salt 
220 ml milk
3 tablespoons oil 
1 egg yolk, beaten

2 raisins, currants, or chocolate chips (eyes)
1 egg yolk (egg wash)
Red food colouring (painting)

Directions 

Mix together all the ingredients (except the raisins, egg yolk for egg wash, and food colouring) and then knead until you have a smooth dough. The dough should not be sticky. If it is sticky, add in some more flour. Place the dough in a greased bowl. Cover and allow the dough to rest at room temperature until it has doubled. Alternatively, you can allow it to rest in the refrigerator overnight. 

Now it's time to have some fun!

Divide the dough into 4 equal pieces. 


Take the first piece and flatten it into an oval/circle. Mine had a diameter of about 5 inches. This will be Santa's face. 


Take a second piece and shape it into a rough triangle then form it around Santa's head for his hat. 


The third piece will be Santa's beard. I wanted to try some different beard techniques here. In this version, I formed an elongated semi-oval/ U-type thing, put it in place, and adjusted it as necessary. 


The fourth piece will form the band for Santa's hat, the pompom on the tip of his hat, his moustache, nose, cheeks, and eyebrows. You can even use the dough for the eyes. I didn't have any black or brown paint so I stuck with the raisins. 

Use scissors and snip the beard, if you like. You can use any extra dough for any decorations for your Santa.  Put in his eyes.


Preheat oven to 350 F. 

Let Santa rise until very puffy. Whisk the egg yolk with a splash of water and paint over the beard, moustache, face, eyebrows, hat band and pom pom. 

Add some red food colouring to the remaining yolk and paint the hat, cheeks, and nose. 

Bake 35 minutes until golden. 

When the Santa has cooled, you can touch up any areas with plain food colouring. 


BreadBakers


#BreadBakers is a group of bread loving bakers who get together once a month to bake bread with a common ingredient or theme. Follow our Pinterest board right here. Links are also updated each month on this home page. We take turns hosting each month and choosing the theme/ingredient.


Wednesday, December 1, 2021

Red Velvet Cupcakes - #FoodieExtravaganza


I have not participated in Foodie Extravaganza in aeons but I had to join for this very special one. Today we are celebrating the arrival of Lauren's gorgeous baby girl! Lauren started this group many years ago and it was an absolute pleasure to bake something to celebrate her and her precious little one! Congrats, Lauren!!! Scroll down to see what the other ladies are bringing to this virtual baby shower.

I chose these red velvet cupcakes because I had been eyeing them a couple weeks ago. Deb from Smitten Kitchen promised more chocolate flavour than you'd typically have in a traditional red velvet cake. I am typically not interested in red velvet but I am glad that I tried this. Definitely more flavourful than others that I have tried. And while delicious and moist and all things good, I think I will stick to chocolate. I am too much of a chocoholic to be satisfied by a hint. 


Red Velvet Cupcakes
Adapted from Smitten Kitchen
Yield ~ 9 cupcakes


Ingredients

1 cup plus 2 tablespoons cake flour
3 tablespoons cocoa powder
1/2 teaspoon salt 
1/2  cup oil 
3/4 cup sugar 
1 egg
2 tablespoons red food colouring
1/2 teaspoon vanilla 
7 tablespoons buttermilk
1/2 teaspoon baking soda 
1 teaspoon vinegar

Directions

Preheat oven to 350 F. Line a cupcake pan with cupcake wrappers. 

Whisk cake flour, cocoa powder, and salt. 
In another bowl, beat oil and sugar until well blended. Next, beat in the egg. 
Add the red food colouring and vanilla and beat well. 
Scrape down the sides of the mixing bowl. 
Alternate adding the flour and the buttermilk in two batches.
Scrape the bowl again. 
Place baking soda in a small dish then stir in the vinegar. Add immediately to the batter with the mixer running on low. Mix for 10 seconds.
Scoop batter into prepared cupcake pan. 

Bake 15 - 20 minutes or until a toothpick inserted into the centre of a cupcake comes out clean. 

Cool and frost as desired. 

Notes

  • I used a lot less oil than the original recipe and was happy with how the cupcakes turned out. You can check out the original recipe and decide for yourself. 
  • I used liquid food colouring. Check out the original recipe for the amounts needed for a gel colour. You would still need to dissolve it in water to avoid moisture loss. 
  • I did not use the traditional cream cheese frosting. This is a simple butter, powdered sugar, vanilla, and milk frosting. Oh, and a splash of rum. It needed a little something!


post signature


Foodie Extravaganza is where we celebrate obscure food holidays by cooking and baking together with the same ingredient or theme each month.

Posting day is always the first Wednesday of each month. If you are a blogger and would like to join our group and blog along with us, come join our Facebook page Foodie Extravaganza. We would love to have you! If you're a spectator looking for delicious tid-bits check out our Foodie Extravaganza Pinterest Board! Looking for our previous parties? 

Tuesday, October 12, 2021

Japanese Chocolate Milk Bread #BreadBakers


I have been MIA from blogging because I took on a night course and I barely have time to play Homescapes much less bake. Each time I am to bake something, life would throw a wrench at me – my ISP went down for multiple days multiple times (it's down right now), my house was flooded, I got surprise exams, my group members would disappear etc. We are about a month from the final exam and deeply mired in what feels like an impossible project. I have timers set on all the apps I usually waste time on and the timers don’t even matter because I am too busy to waste time. Seemed like a perfect time to bake something! 

Ha! I just desperately needed a break and baking is my stress-free zone. Plus, this month the bread bakers are using tangzhong and it has been a long time since I’ve done that. Thanks for the theme, Karen! For those who don’t spend their lives reading about bread techniques, here’s a quick primer on tangzhong. And after you have read that, be sure to try all the recipes listed below!

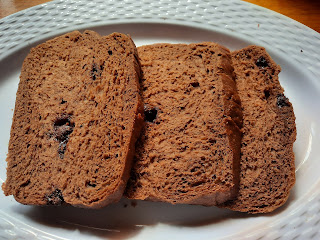
I kept things simple by grabbing a recipe from King Arthur and resisting the urge to make any changes. It’s amazing as is. It’s wonderfully soft and chocolatey and biting into the chocolate chips is honestly the best part. I think that some dark cherries would work rather well here too. This loaf barely lasted 24 hours in my house and I cannot wait to make it again. I saw suggestions to use it as French toast and such the like. I was too busy eating it as is to try that. 

Japanese Chocolate Milk Bread

Tangzhong
14 grams bread flour
43 grams milk
43 grams water
Tangzhong Additions
57 grams butter
76 grams milk 
1 egg
1 tablespoon instant yeast
 Dough
270 grams bread flour 
28 grams cocoa powder
50 grams sugar
1 teaspoon salt 
12 grams powdered milk 
1/2 cup chocolate chips
1 egg plus a tablespoon of water for egg wash

Directions

In a small saucepan, combine the tangzhong ingredients over medium heat. Stir until thickened. Don't walk away. If you have a thermometer, check that it has reached 150 F degrees. 
Transfer the tangzhong to a mixing bowl. 

Let it cool a bit then add butter, milk, an egg, and yeast. Stir well. 

Next, add flour, cocoa powder, sugar, salt, and powdered milk.  

Knead well until the dough is smooth and elastic. This could take up to 15 mins. Knead in the chocolate chips. One option is to save the chocolate chips for the shaping step. That might be easier. 

At this point, I put my dough in a greased bowl and allowed it to ferment in the fridge overnight. You can let it bulk ferment at room temperature until puffy (about 2 hours). 


When the dough, is ready, divide it into four equal pieces. Flatten each piece, flatten it into a 5" x 8" rectangle. You can sprinkle on the chocolate chips at this step if you have waited. Fold the rectangle into three as you would a letter. Flatten it once again but this time into a 3" x 6" rectangle. Now roll from the short side into a log. Be sure all your logs are the same size or you will have an uneven looking (but still delicious) bread.

Place each log in a greased 9" x 5" pan. 

Allow to proof at room temperature until puffy and cresting over the pan. 

When it is almost ready, preheat the oven to 350 F. 

Brush the proofed dough with egg wash and bake 25-30 minutes until a thermometer in the centre reads 190 F. Chocolate loaves are hard to judge as you can't base their readiness on colour. 

Cool. Eat. Make again.


BreadBakers
Blurb: #BreadBakers is a group of bread loving bakers who get together once a month to bake bread with a common ingredient or theme. Follow our Pinterest board right here. Links are also updated each month on this home page.

We take turns hosting each month and choosing the theme/ingredient.

post signature

Thursday, July 15, 2021

Rum Cake - #BundtBakers


Rum Cake
Rum Cake


I swore I was not going to bake any cakes until I lost all the weight I gained this mango season. But after doing some really hated burpees, I thought I earned a reward. Rum cake to be specific. My fellow Jamaicans think of a fruit cake when I mention rum cake but tourists think vanilla cake soaked in rum. I guess the Tortuga style cake is what they are offered in the resorts? Who knows.  This one is definitely a vanilla cake since fruit cakes are not my first preference. 

The Bundt Bakers are baking with booze today. Scroll down to feast your eyes on some other boozy cakes.


Rum Cake

Ingredients

Cake

315 grams all purpose flour
42 grams cornstarch
2 teaspoons baking powder
1/2 teaspoon baking soda
1/2 teaspoon salt
1 cup buttermilk
1/4 cup oil
1/4 cup rum
1 tablespoon vanilla
170 grams butter
2 cups sugar
4 eggs

Rum syrup

1/4 cup butter
1/2 cup sugar
1/4 cup water
1/2 cup strong rum (I used J Wray & Nephew white Overproof)
1/2 teaspoon vanilla


Directions
Preheat oven to 350 F.
Thoroughly grease a Bundt pan.
Whisk flour, cornstarch, baking powder, baking soda, and salt. 
Whisk together buttermilk, oil, rum, and vanilla. 
Cream butter and sugar until light and fluffy. Add eggs one at a time, mixing each until it's is blended in. 
Alternate adding the dry mixture and the wet mixture. Add the dry mixture in 3 parts and the wet in 2 parts. Mix only until it is just combined and there are no streaks of flour. 
Pour the mixture into the thoroughly greased Bundt pan. 
Bake 40 minutes or until a skewer inserted into the cake comes out clean. 

Immediately after the cake is out of the oven, start on the rum syrup. Add the butter, sugar, and water to a saucepan over medium low heat. Simmer until the sugar has completely dissolved. 
Remove from the flame and add the rum and the vanilla. 

Poke the cake, still in the pan, several times with a long skewer. Slowly drizzle about a third of the syrup over the cake. Let it rest for 5-10 minutes. 

Turn the cake out onto a platter and poke the cake several times again. Slowly drizzle the remaining syrup over the cake. Don't rush it, you want it to soak into the cake and not run off. 


BundtBakers


#BundtBakers is a group of Bundt loving bakers who get together once a month to bake Bundts with a common ingredient or theme. You can see all of our lovely Bundts by following our Pinterest board. We take turns hosting each month and choosing the theme/ingredient.
Updated links for all of our past events and more information about BundtBakers, can be found on our home page.

post signature

Tuesday, July 13, 2021

Garlic Rolls #BreadBakers


Garlic Rolls


This month the Bread Bakers are baking up their favourite loaves. I decided to do a combination of my favourite (filled rolls) and my mother's favourite (garlic). These are extra buttery (diets are broken here) and full of flavour. This is definitely one for my regular rotation. 

On the day I made these, internet was down and my nephews were with me. No internet is a child's worst nightmare, apparently. However, the 9 year old offered to help instead of just (*ahem* along with) bugging me for mobile data. He rolled out the dough, spread filling, rolled it up and even sliced. I was quite proud of him. He's showing more interest in helping in the kitchen so I need to set up more things for him to do. The 2 year old also a approved. I caught him stealing the middles of the rolls while they were still cooling. He doesn't usually eat bread so I was happy to see him eating this.


Be sure to scroll down to see some other favourite breads!


Garlic Rolls


Ingredients

Dough
480g - 520g flour
2 tablespoons sugar
2 teaspoons instant yeast
1 1/2 teaspoons salt
3/4 cup water (See notes)
1/4 cup oil
2 eggs
1 yolk

Filling
3/4 cup butter
8 cloves garlic
1/2 cup chopped parsley
1/2 teaspoon salt
1/4 teaspoon black pepper


Mix 480g flour, sugar, yeast, and salt. Whisk together water, oil, eggs and the yolk. 
Add to the wet ingredients to the dry ingredients. Knead until it forms a smooth, soft, and cohesive dough approximately 7 minutes. 
If the dough is wet, add in some more flour. If it feels too dry, splash in a little water at a time. 

Allow the dough to rise in an oiled bowl until doubled. I prefer to let this rise into the fridge overnight. 

Mix together all the filling ingredients.  Divide the filling into two. Half will fill the rolls and the rest will be brushed on after baking.

Grease a 9" x 13" pan and a 9" pan. You can so bigger rolls than I did and put them all in one pan.

Divide dough into 2 pieces. Roll each of the pieces into an approximately 12" x 10" rectangle. Spread the filling across the dough. Roll the dough up starting along the long side. 

Use a knife or floss to cut rolls a little higher than an inch and place them in each pan.

Allow to rise about 25 minutes or until doubled.

Bake 30-35 minutes or until golden.

Remove the rolls from the oven and immediately brush with the remaining filling. 

Notes

  • The original recipe used a cup of water. That was way too much for my dough. I would probably even start with 1/2 cup of water and then increase as needed.
  • These are super buttery! You could cut down on some of the filling (maybe cutting back from the amount brushed on after baking) and still have some delicious rolls.


BreadBakers
#BreadBakers is a group of bread loving bakers who get together once a month to bake bread with a common ingredient or theme. You can see all our lovely bread by following our Pinterest board right here. Links are also updated after each event on the #BreadBakers home page. We take turns hosting each month and choosing the theme/ingredient.
post signature

Thursday, May 20, 2021

Nuggle Mini Bundt Cakes #BundtBakers


These mini Bundts are filled with chopped bits of a chocolate bar called Nuggle. Nuggle is made in Trinidad by Charles Chocolates. They describe them as having lots of peanuts, chewy fudge, creamy caramel in milk chocolate. And when you pull one out of the package, that's exactly what it looks like - a pile of peanuts covered in chocolate. 


Because of all the nuts, it has 7 g of protein and my mother treats it like a protein bar. She buys one or two each time she is out running errands. When she is doing her monthly shopping, she buys a few bars to save for when she's heading out again. And then she eats them all at once. Suffice to say, she loves Nuggle. 


This month, Bundt Bakers are putting their mother's favourite chocolate bars into Bundt cakes. I grabbed a Nuggle, scroll down to see what chocolate bars the other Bundt Bakers grabbed. 


Nuggle Mini Bundt Cakes
Yield: 4 mini Bundt cakes

Ingredients 

Cake 
3/4 cup (90g) flour 
1/2 teaspoon baking powder
1/4 teaspoon salt
1/4 cup butter, room temperature
1/2 cup sugar 
1 egg
1/4 teaspoon vanilla 
1/4 cup milk
1 54g Nuggle bar finely chopped

Topping 
Chocolate sauce 
1/2 54g Nuggle bar 


Directions 

Thoroughly grease and flour four 1 cup capacity mini Bundt pans. Preheat oven to 350 F. 

Whisk flour, baking powder, and salt and set aside. Cream butter and sugar until fluffy. Add the egg and beat well. Scrape the sides of the bowl if necessary then beat in the vanilla. 

Add the flour mixture in three parts alternating with the milk, starting and ending with flour. 

Mix until well-combined. Next, gently fold in the chopped Nuggle You might be tempted to add more Nuggle pieces. However, too many pieces might cause your mini cakes to stick. 

Divide among the four pans. 

Bake 15 minutes or until a toothpick inserted into a cake comes out clean. 

Cool until the little cakes are still a bit warm then carefully remove from the pan. 

Top with just enough chocolate sauce to let the Nuggle pieces stick to the top. Sprinkle with chopped Nuggle. 

Enjoy!


BundtBakers


#BundtBakers is a group of Bundt loving bakers who get together once a month to bake Bundts with a common ingredient or theme. You can see all of our lovely Bundts by following our Pinterest board. We take turns hosting each month and choosing the theme/ingredient.
Updated links for all of our past events and more information about BundtBakers, can be found on our home page.


post signature


Tuesday, May 11, 2021

Paw Print Bread #BreadBakers


Some years ago, I saw pictures of a Panda Bread and an Owl floating around the internet. It was during the time that I baked bread multiple times a week so I jumped at the chance to try. I opted for the owl. I loved the turnout even though my owl looked a bit drunk. However, I never tried anymore because I remember that kneading the different colours into the dough was tedious. Fast forward to some months ago when I wanted to do a Surprise Inside cake. I nixed that idea when I realised how much cake would be wasted. But maybe I could try surprise inside bread instead? I proposed that theme to Bread Bakers. 

I am excited that so many opted to join in on creating these loaves this month. I had planned one design and then realised that I just didn't have those skills YET. Back to the drawing board. I used play dough to plan a flower inside a loaf. It worked in play dough but when I cut into my loaf, it was just random swirls. 

I decided to move onto the paw print. It wasn't easy. While I have a lot of in progress pictures of my failed flower, I don't have many of this paw. I was too busy trying to balance the four pieces of dough on top. If I did this again, I think I would go for 3 toes instead of 4. The paw pad got a bit messed up but each person I showed, immediately recognized that it was a paw. Happiness.

Not a looker. But cut him for a surprise.


Thanks to the Bread Bakers for joining me this month. Scroll down to see all their surprises and learn about our group. 

Paw Print Bread

Ingredients

400 grams flour
2 teaspoons instant yeast
3 tablespoons sugar
1 teaspoon salt
1 egg
3 tablespoons oil
220 ml milk
Food colouring

Directions

Whisk flour, yeast, sugar, and salt. Add the egg, oil, and milk. Knead all the ingredients to form a shaggy dough - no more than 2 minutes. You just want the dough to just start coming together. 

Divide the dough into 2 pieces. One piece should be three times the weight of the other. Use your scale for this. Weigh the dough. Divide the weight by 4. Remove that amount of the dough and place in a separate container. 

Example. If your total dough weighs 720 grams. The smaller portion should weigh 720/4 = 180 g. 

Knead the larger portion until it forms a soft, slightly tacky dough. 

Add food colouring of your choice to the second piece and knead until the colour is evenly distributed. This takes a few minutes. I used about 10 drops or so of red food colouring to achieve this colour. 

Cover both pieces of dough and leave to bulk ferment at room temperature until doubled. You can also refrigerate overnight. That is my preferred method. 


When the dough has doubled, the fun begins. 

Grease a loaf pan. I used a 9" x 5" pan but I think an 8" x 4" might make handling the toes easier. Or just doing three toes. I will experiment. 


Divide the coloured dough into two equal pieces. 
Divide one portion into  equal pieces. These will be the toes. The larger dough will be the paw pad. 

Divide the white dough into two pieces. One piece should be slightly larger. Now, divide the larger portion into 4 equal pieces. The large portion will surround the paw pad and the smaller pieces will surround the toes. 

Take the large coloured dough and stretch and roll it into a rectangle that's about 8" x 3". This is a rough measurement. Roll into a tight log. 

Take the large white dough and stretch and roll into a rectangle about 8" x 3". Place the coloured log on this white rectangle and roll it up really tight. 

Place seam side down in a greased loaf pan. 


Take a small coloured ball and stretch and roll it into an 8 inch by 1 inch rectangle. Roll this into a tight log. I guess you could roll it into a log as the beginning but I worry that this is what went wrong with my flower. 

Take a small white ball and stretch and roll it into a. 8 inch by 3 inch rectangle. Place the coloured log on this rectangle and roll it up really tight. 

Repeat with the other three coloured toes and their white "covers". 

Place the toes on top of the pad. It could get a bit top heavy. Just hope for the best. 

Allow to proof at room temperature until the dough is puffy. Before the dough is ready, preheat oven to 350 F. 

Bake the risen dough for 30-35 minutes. 

Remove from oven. Cool, slice and marvel at your amazing work. 


BreadBakers
 #BreadBakers is a group of bread loving bakers who get together once a month to bake bread with a common ingredient or theme. Follow our Pinterest board right here. Links are also updated each month on this home page.

We take turns hosting each month and choosing the theme/ingredient.

Tuesday, April 13, 2021

Marble Wheat Loaf #BreadBakers


This month, the Bread Bakers are showcasing bread made with whole grains. Lots of thanks to our host, Wendy!

My first attempt at a loaf for this month was a total flop. I was very excited about the onion loaf as it used my recently started sourdough starter. I even ran out just before our weekend lockdown to grab the onions. Alas, it was a complete waste of time and ingredients. 

I had originally planned on doing this marbled loaf so I crossed my fingers and hoped another recipe didn't fail me. I literally held my bread when I sliced into it. It didn't fail but I did have to make some changes to this King Arthur Flour recipe. The loaf is made by rolling a white flour dough with a whole wheat flour dough. In the original recipe, the white dough had a 70% hydration. I thought that would be way too sticky for this purpose and I was right. I lowered it a bit. Still a bit sticky but workable.

Scroll down to see the other whole grain bread that we have for you today!


Marble Wheat Loaf

Ingredients

White Dough
250 g all purpose flour
2 tablespoons powdered milk
1 teaspoon salt
1 tablespoon sugar
1 1/2 teaspoon yeast
2 tablespoons oil
160 ml water

Wheat Dough
170 g whole wheat flour
3 tablespoons powdered milk
1/2 teaspoon salt
1 1/2 tablespoons sugar
2 1/2 teaspoons yeast
2 tablespoons oil
113 ml water

1 egg beaten for joining the two doughs

Directions

Mix all the ingredients for the white dough until smooth. If it's too sticky to handle, sprinkle in some extra flour. Place in a greased bowl and allow to rise overnight. 
Next, mix all the ingredients for the wheat dough. Place in a greased bowl and allow to rise overnight. 

When both doughs, have risen, roll out each into a 12" x 9" rectangle. Brush the beaten egg on the white dough then place the whole wheat dough on top. Roll up along the long side as tightly as possible. 

Place in a greased 9" x 5" loaf pan and allow to rise until puffy and above the rim of the pan.

Meanwhile, preheat the oven to 350 F. 

When the loaf is ready, bake for 30-35 minutes or until the top is golden. Cool completely before slicing.

Notes

  • I prefer an overnight rise as it enhances the flavour. You can do a room temperature rise if you like.
  • The original recipe calls for cocoa powder but I forgot it. It means the whole wheat swirl is lighter but I was still happy with it. You can use a tablespoon of cocoa if you want it darker.
  • Adapted from King Arthur Flour's Spiraled Wheat Loaf


BreadBakers
#BreadBakers is a group of bread loving bakers who get together once a month to bake bread with a common ingredient or theme. Follow our Pinterest board right here. Links are also updated each month on this home page.

We take turns hosting each month and choosing the theme/ingredient.

post signature

Monday, March 29, 2021

Lemon Muffins #MuffinMonday


I got two large lemons recently and hid them from a lemonade fate. I don't get lemons often because they only grow in a few areas of Jamaica and I don't live in those areas. I finally decided that I'd make  some muffins with them. 

My lemons were really sweet so these muffins didn't have much of a tang. But I still enjoyed them. This recipe was slightly adapted from Handle the Heat. She has an interesting method. She chills the muffin batter for at least an hour up to overnight and this should lead to a taller muffin. I don't think it worked for me. However, I'll try again soon as I like the idea of mixing a batter hours in advance. 

Be sure to scroll down to see what other muffins we have in store for you this Muffin Monday!


Lemon Muffins
Yield: 12 muffins

Ingredients

2 cups flour
3/4 cup sugar
1 tablespoon baking powder
1/2 teaspoon baking soda
1/2 teaspoon salt
1 cup milk
1 egg
1/2 cup oil
2 tablespoons lemon juice
2 tablespoons lemon zest

Directions

Preheat oven to 400 F.  Grease or line a muffin pan. 
Whisk flour, sugar, baking powder, baking soda, and salt. 
In a separate bowl, whisk milk, egg, oil, lemon juice, and lemon zest.
Add the wet ingredients to the dry ingredients and gently combine. 

Divide batter among the muffin wells. 

Bake 16 minutes or until a toothpick inserted into a toothpick comes out clean.

  • Lemon Muffins from Passion Kneaded
  • Papaya Orange Muffins from Magical Ingredients
  • Peanut Butter Banana Muffins from Making Miracles
  • Sourdough Banana Nut Crunch Muffins from Zesty South Indian Kitchen
  • Springtime Chocolate Chip Muffins from Food Lust People Love
  • White Chocolate Muffins with a Pistachio Glaze from Karen's Kitchen Stories


  • Muffin Monday
    #MuffinMonday is a group of muffin loving bakers who get together once a month to bake muffins. You can see all of our lovely muffins by following our Pinterest board. Updated links for all of our past events and more information about Muffin Monday can be found on our home page.
    post signature

    Monday, February 22, 2021

    Churro Mini Muffins - #MuffinMonday

    Churro Mini Muffins


    One of things I miss about living in the U.S. is visiting the mall food court.  The Miami International Mall had a Churro Mania. Deep fried goodness topped with cinnamon sugar, chocolate, condensed milk, or even Nutella. All delicious.  

    My mini muffins are mimicking some churros as best as they can - alas, they aren't fried. I went with some cinnamon sugar and and some condensed milk. 

    As always, scroll down to find the other muffins we have for you this Monday. 


    Churro Mini Muffins
    Yield: 20 mini muffins

    Ingredients

    Muffin

    1 1/2 cups flour
    1 1/2 teaspoons baking powder
    1/4 teaspoon salt
    1 egg, beaten
    1/2 cup sugar
    1/2 cup milk
    1/3 cup oil
    1teaspoon vanilla

    Topping
    1/4 cup melted butter
    1/2 cup sugar 
    2 teaspoons cinnamon
    Condensed milk


    Directions

    Preheat oven to 350 F. Line a mini muffin pan or grease it well.

    Whisk flour, baking powder and salt. 
    In a separate bowl, whisk the egg, sugar, milk, oil and vanilla. 

    Pour into the flour mixture. Gently combine until there are no streaks of flour. The batter is thick and you may have some lumps. Don't overmix.

    Scoop into the prepared muffin wells and bake 12 minutes or until a toothpick inserted in a muffin comes out clean.

    Cool completely. 

    For cinnamon sugar coated muffins, dip the muffins into melted butter. Then toss in a mix of the cinnamon and sugar. 
    For condensed milk ones, simply drizzle as much condensed milk as you like. The condensed milk does soak into the muffin. 


    Muffin Monday

    post signature

    Tuesday, February 9, 2021

    Jerk Chicken Sausage Pizza #BreadBakers


    This month the Bread Bakers are serving up pizza. Scroll down to see all the recipes. Thanks for hosting, Karen

    For this pizza, I wanted to try a new pizza crust recipe. I opted for King Arthur Flour's recipe and didn't read the full recipe before I started. Don't do that people!  While the ingredient ratios are relatively similar to others that I've seen, the directions are different.

     I could have skipped the fuss but I decided to try it. Oh, I did skip the first rise room temperature. I was supposed to let it rise and then refrigerate overnight. But I completely forgot and tossed it straight into the fridge after kneading. Even with the extra waiting and proofing and parbaking, I think I'd try this recipe again. I do want to add some flavour to my crust though.


    Jerk Chicken Sausage Pizza

    Ingredients
    Dough (2 12 inch pizzas)
    360 grams flour
    2 teaspoons of instant yeast
    1/4 teaspoon salt
    2 tablespoons oil
    198g to 255g water

    Toppings (per 12 inch pizza)
    1/2 cup pizza sauce
    2 cups cheese
    1 jerk sausage, thinly sliced (or as much as you like!)


    Directions

    Combine all the ingredients starting with the lower amount of water especially if you're in a humid climate.  Knead for 4 to 5 minutes. You want a dough that sticks a bit to the bottom of the bowl.  

    Refrigerate overnight or up to 24 hours. 

    Remove from the fridge and divide  into two. You can freeze one piece if you desire. Gently pat the dough into a circle. Don't use a rolling pin. Let the dough rest for 15 minutes. 

    Spray a baking pan and drizzle it with a bit of oil. 

    Place the dough in the pan and continue to gently stretch into a 12 inch round. Don't fight the dough. Let it rest for another 15 minutes and then try again. 

    Allow the dough to rest covered at room temperature for 90 minutes or until puffy. 

    Preheat the oven to 450 F. 

    Bake the dough for 8 minutes on the lower rack. You don't want it to start browning just to set.  

    Remove from the oven and add the toppings. 

    Bake 10 - 15 minutes until the cheese is melted and the crust is browned to your liking. 

    Note: Parbaked crusts can also be frozen. See the original recipe for more information about handling this dough. 


    BreadBakers
    #BreadBakers is a group of bread loving bakers who get together once a month to bake bread with a common ingredient or theme. You can see all our lovely bread by following our Pinterest board right here. Links are also updated after each event on the #BreadBakers home page. We take turns hosting each month and choosing the theme/ingredient.

    Monday, January 25, 2021

    Coconut Cornbread Muffins - #MuffinMonday


    For someone who won't eat cornmeal, I sure have reached for it a lot recently. I watched Jamaican YouTuber, Adrian Morris, make a batch of coconut cornbread on his channel and thought that would be great as muffins. (By the way, if you're looking for authentic Jamaican recipes, that's a good source.)

    I didn't follow his recipe but ran with the idea. Jamaicans add cinnamon (leaf) and nutmeg to their cornmeal porridge . Coconut is also amazing with those spices so I added them in. However, I didn't want to add too much and darken the batter.

    I didn't taste them but my mother and brother gave them good reviews.

    We have a lot of corn muffins for this month's Muffin Monday. Be sure to scroll down to see all the corn and non-corn ones too. 

    Coconut Cornbread Muffins
    Yield: ~14 muffins

    Ingredients

    120 grams cornmeal
    120 grams flour
    1 tablespoon baking powder
    1/2 teaspoon salt
    1/2 teaspoon cinnamon
    1/4 teaspoon nutmeg
    1 cup shredded coconut
    2 eggs
    1/2 cup sugar
    1/2 cup coconut oil
    1 cup coconut milk


    Directions

    Preheat oven to 425F. Line your muffin wells or grease them well.

    Whisk the cornmeal, flour, baking powder, salt, cinnamon, and nutmeg. Whisk until there are no streaks of white or yellow. It's one even colour. Stir in the shredded coconut.

    In a separate bowl, whisk the eggs and sugar. Next, whisk in the coconut oil and milk. 

    Add the wet ingredients to the dry ingredients. Gently mix until all the dry ingredients are moistened. Don't overmix.

    Scoop into the prepared muffin wells. Fill the wells almost full. 

    Bake 5 minutes then lower the temperature to 350 F. Bake another 11 to 13 minutes or until q toothpick inserted into the centre of a muffin comes out clean. 

    Cool and enjoy.

    Notes

    1.  If you're in a cooler climate and your coconut oil has solidified, melt and cool it before using.
    2.  I tried these with muffin liners and without. Thankfully, they didn't stick. 

    Muffin Monday

    #MuffinMonday is a group of muffin loving bakers who get together once a month to bake muffins. You can see all of our lovely muffins by following our Pinterest board. Updated links for all of our past events and more information about Muffin Monday can be found on our home page.
    post signature

    Tuesday, January 12, 2021

    Turtle Bread - #BreadBakers


    There is a really old Jamaican Christmas tradition of using bread shaped like animals as a centrepiece on the Christmas table. Some refer to them as fancy breads. This tradition is so old that most of my friends had never heard of it. I guess it has gone the way of the Jonkonnu parades. They happen in some communities somewhere but most of us have only read or hear about them. I actually saw one in person for the first time this past Christmas. I was in a supermarket that I don't normally go into. The bakery by my house apparently sells them too but I didn't get a chance to stop by. 

    Jamaican Duck Bread Source


    The most popular animal seems to be a duck floating in a pond. I looked at a picture and honestly just couldn't figure out how I would do it. Probably a cop-out but I just couldn't figure out the breast area in particular. It seems a lot of details might get lost in the oven. So I went turtle instead. Easy enough - the hardest part is doing the slashes on the shell. I didn't do it well and Mr. Turtle looked fine enough. 


    My nephew won't let me eat Mr. Turtle. He says the turtle needs to live out his 100 years so Mr. Turtle is now in the freezer. Don't tell my nephew, but he is going to become a bread pudding next week. 100 years comes really quickly when you're a turtle.


    Thanks for hosting Animal Shaped Bread, Stacy! It was fun getting creative with my dough and I can't wait to try other animals - even that duck. Scroll down to see all the other animals. 


    Turtle Bread

    Ingredients
    400 grams flour
    3 tablespoons sugar 
    2 teaspoons yeast 
    1 teaspoon salt 
    220 ml milk
    3 tablespoons oil 
    1 egg yolk, beaten
    2 raisins or currants (eyes)
    1 egg white plus a splash of water (egg wash)

    Directions
    Mix together all the ingredients (except the raisins and egg white) and then knead until you have a smooth dough. The dough should not be sticky. If it is sticky, add in some more flour. Place the dough in a greased bowl. Cover and allow the dough to rest at room temperature until it has doubled. Alternatively, you can allow it to rest in the refrigerator overnight. 

    When the dough is ready, pinch off a 70-gram piece and five 30-gram pieces. These will form his head, legs, and tail and the remaining dough will form the body. Shape the body into a flattened boule. Shape the 70-gram piece into a ball and then attach the head to the body.  Next shape the legs and tail. You can shape the tail a bit triangular. 

    For the eyes, I suggest putting the raisins up a bit higher than you would think. As my dough proofed, the raisins moved lower and ended much lower during the oven spring. I had to use a toothpick to reattach them in the correct place. Honestly, sticking them on with a toothpick after baking is probably the easiest route. 

    My eyes are too low.


    Cover the dough and allow to proof at room temperature until noticeably puffy. This could take up to an hour depending on the temperature of your room. 

    Preheat the oven to 350 F. 

    When the dough is ready, brush with the egg white mixed with water. Next, slash his back with a sharp knife to form his shell. Stress not if it isn't perfect. You can also give him some toes. I did cut some but didn't snip deep enough so that detail was lost in the oven.

    Bake 35 minutes or until golden. 
    Enjoy your creation! 


    BreadBakers
    #BreadBakers is a group of bread loving bakers who get together once a month to bake bread with a common ingredient or theme. You can see all our lovely bread by following our Pinterest board right here. Links are also updated after each event on the #BreadBakers home page. We take turns hosting each month and choosing the theme/ingredient.
    post signature